Storage inspiration for every room – with smart solutions that combine style and function. Create a home where every surface becomes a storage opportunity.
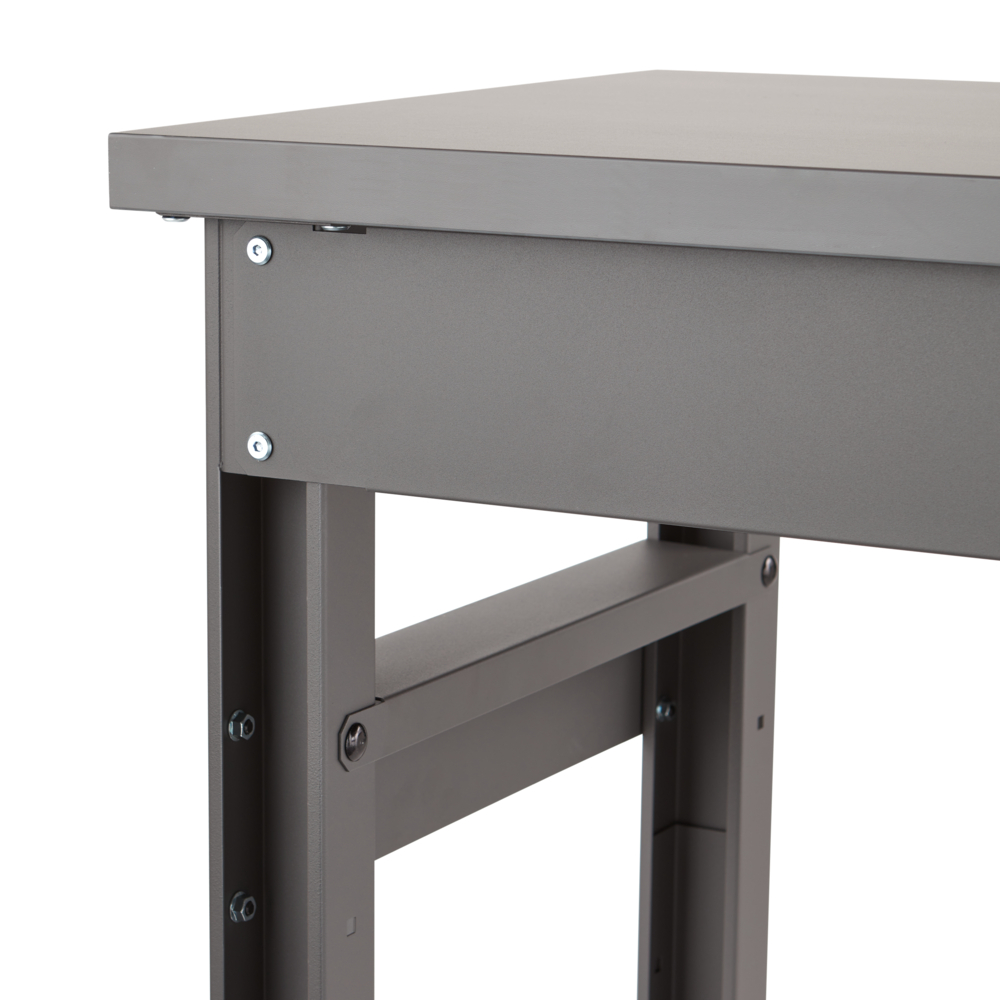
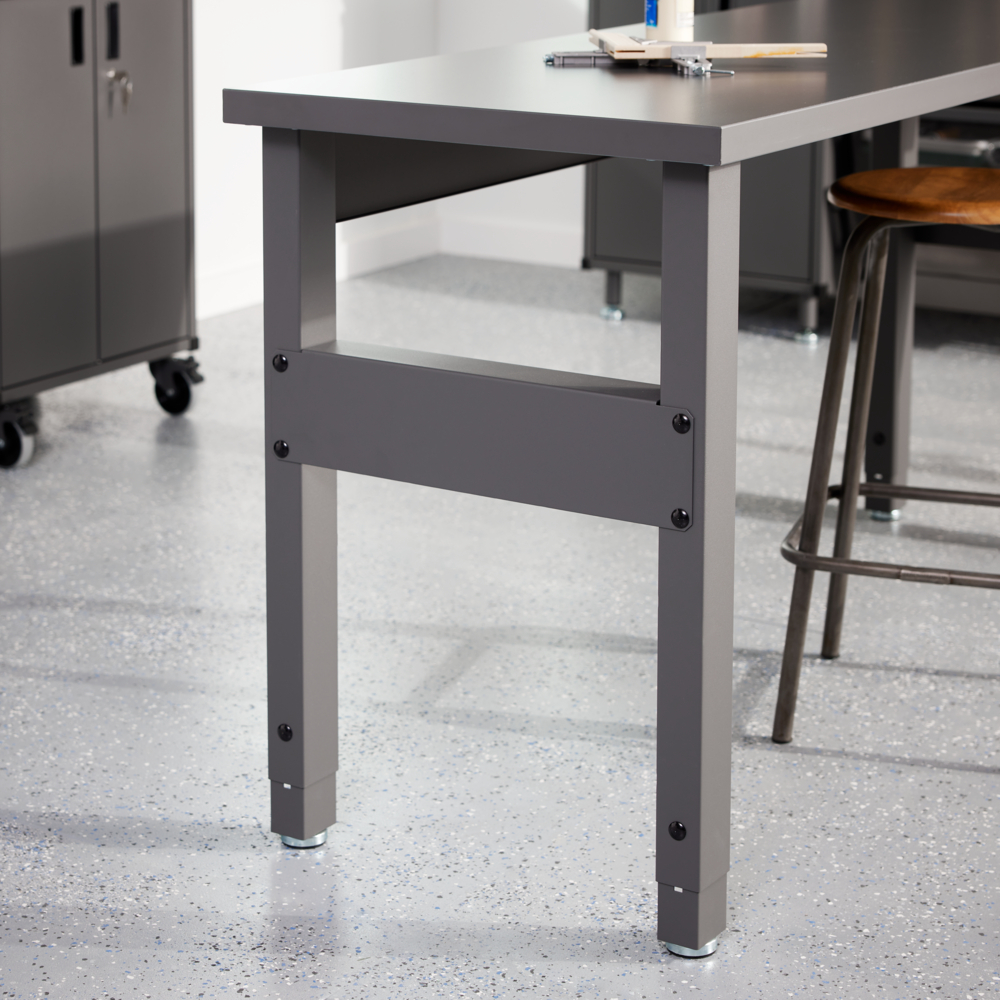
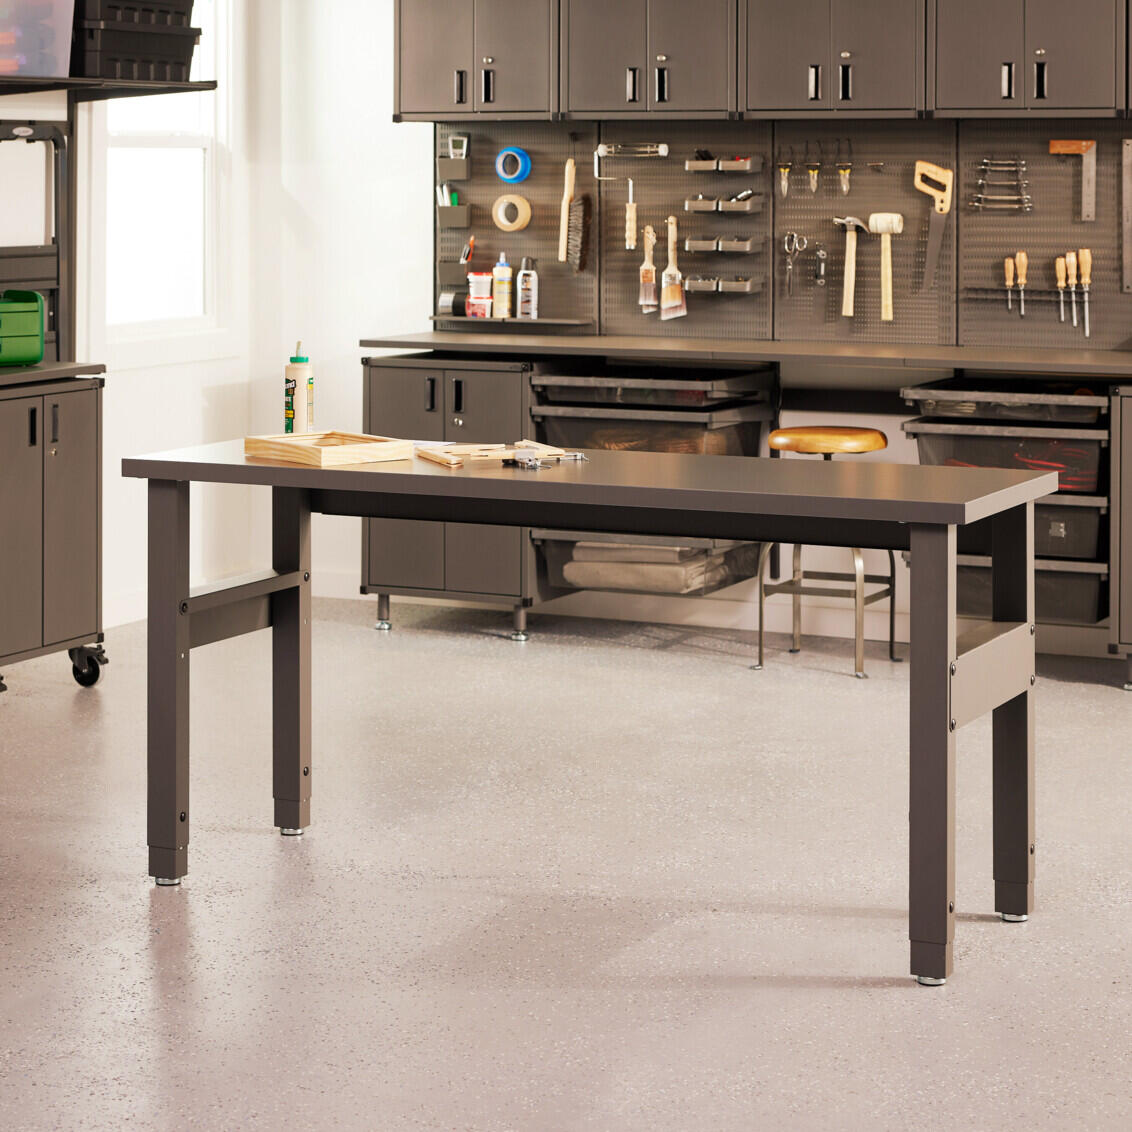
Elevate your workspace with the durable freestanding Garage+ work bench. The worktop is made from chipboard with a solid wood core and professional laminate quality. This top can handle heavy loads of up to xxx kilos, ensuring a robust platform for your projects. With an adjustable height range of 874-1117mm, the legs offer versatility for different projects. The included adjustable feet ensure stability even on uneven floors.
4700120 | Work Bench 1821mm mattegrey , Matte grey 1821x620x40 mm
4700121 | 6' Work Bench LegsKIT mattgrey , Matte grey 0x0x0 mm
ColorMatte grey
Width (mm)1821
Depth (mm)620
Height1117
Technical description
<
Technical description
Work bench top in chipboard with solid wood core featuring a high quality laminate. To be combined with workbench legs to get a freestanding workbench.
To get a complete Work Bench you need the following articles:
4700120 Work bench
4700121 Work bench legs
The work bench legs are adjustable in height: 834-1077mm (32-7/8” to 42-3/8”).
Adjustable feet for uneven floors included in work bench leg packaging.
Work bench top made from chipboard with a solid wood core and professional laminate quality with edgebanding on all sides.
Maximum load for the work bench is 1066 kg.
Planning rules
<
Planning rules
Measurements for assembled workbench:
Width: 1820 mm (71-5/8")
Depth: 620 mm (24-3/8")
Height: 834-1077 mm (32-7/8”-42-3/8”)
Possible height ranges (min/max, incl. adjustable feet) for an assembled workbench (from floor to workbench top surface):
834 - 855mm (32-7/8"-33-5/8")
866 - 887mm (34-1/8"-34-7/8")
898 - 919mm (35-3/8"-36-1/8")
930 - 951mm (36-5/8"-34-1/2")
962 - 983mm (37-7/8"-38-3/4")
994 - 1015mm (39-1/8"-40")
1026 - 1047mm (40-3/8"-41-1/4")
1058 - 1079mm (41-5/8"-42-1/2")
Note: minimum 933 mm (36-3/4" height required to fit with a mobile unit (lower cabinet with casters) under the workbench.
Safety and care
<
Safety and care
Safety
Note! Do not place Elfa products in direct contact with water.
Care
Wipe clean with a cloth dampered with a mild cleaner. Wipe dry with a clean cloth.
Assembly Instructions
<
Assembly Instructions
Step 1: Place the work bench upside down on the floor.
Step 2: To distinguish between the front and rear legs, identify the two holes on the top side of the rear leg. Place the two rear legs at the back edge of the work bench. The opening of the U‑shaped legs should face backwards.
Step 3 (optional): If you want to attach the work bench to the wall, place the included small L‑shaped wall mounts at the outer edge of each rear leg. The long part of the “L” should be positioned on the outer sheet‑metal part of the leg.
Step 4: Attach the rear legs to the work bench using 8 hex screws (4 per leg). Do not fully tighten yet.
Step 5: Place the two front legs at the front edge of the work bench. The opening of the U‑shaped legs should face backwards. Attach the front legs using 8 hex screws (4 per leg). Do not fully tighten yet.
Step 6: Attach the first adjustable foot part to one of the rear legs using 2 screws and 2 nuts. It is recommended to use the fourth hole if you want a mobile drawer system unit under the work bench.
Step 7: Attach the remaining adjustable foot parts to the other bench legs using the remaining 6 screws and 6 nuts. Preferably use the fourth hole if you want a mobile cabinet with casters under the work bench.
Step 8: Locate the side brace and attach it in the predefined holes between the front and rear legs (left and right) using 6 screws and 6 nuts per leg.
Step 9: Now fully tighten all screws and nuts.
Step 10: Align the rear stabilising brace and attach it between the rear legs in the predefined holes on the back of the legs, using 4 hex screws.
Step 11: Attach the rear stabilising brace to the work bench using 5 screws through the predefined holes.
Step 12: Turn the work bench to the upright position (at least 2 people required).
Step 13: Adjust the adjustable feet on the work bench legs to level the work bench. Turn clockwise to increase the height.
Step 14 (optional): If you want to secure the work bench to the wall, place it against the wall and fasten using screws through the L‑shaped wall mounts. Screws not included.
Elevate your workspace with the durable freestanding Garage+ work bench. The worktop is made from chipboard with a solid wood core and professional laminate quality. This top can handle heavy loads of up to xxx kilos, ensuring a robust platform for your projects. With an adjustable height range of 874-1117mm, the legs offer versatility for different projects. The included adjustable feet ensure stability even on uneven floors.
Color
Size
Width: 1821 mm Depth: 620 mm
<
Select size
Width (mm): 1821
Depth (mm): 620
Height: 1117
730,90
Specification
<
Specification
Elevate your workspace with the durable freestanding Garage+ work bench. The worktop is made from chipboard with a solid wood core and professional laminate quality. This top can handle heavy loads of up to xxx kilos, ensuring a robust platform for your projects. With an adjustable height range of 874-1117mm, the legs offer versatility for different projects. The included adjustable feet ensure stability even on uneven floors.
4700120 | Work Bench 1821mm mattegrey , Matte grey 1821x620x40 mm
4700121 | 6' Work Bench LegsKIT mattgrey , Matte grey 0x0x0 mm
ColorMatte grey
Width (mm)1821
Depth (mm)620
Height1117
Technical description
<
Technical description
Work bench top in chipboard with solid wood core featuring a high quality laminate. To be combined with workbench legs to get a freestanding workbench.
To get a complete Work Bench you need the following articles:
4700120 Work bench
4700121 Work bench legs
The work bench legs are adjustable in height: 834-1077mm (32-7/8” to 42-3/8”).
Adjustable feet for uneven floors included in work bench leg packaging.
Work bench top made from chipboard with a solid wood core and professional laminate quality with edgebanding on all sides.
Maximum load for the work bench is 1066 kg.
Planning rules
<
Planning rules
Measurements for assembled workbench:
Width: 1820 mm (71-5/8")
Depth: 620 mm (24-3/8")
Height: 834-1077 mm (32-7/8”-42-3/8”)
Possible height ranges (min/max, incl. adjustable feet) for an assembled workbench (from floor to workbench top surface):
834 - 855mm (32-7/8"-33-5/8")
866 - 887mm (34-1/8"-34-7/8")
898 - 919mm (35-3/8"-36-1/8")
930 - 951mm (36-5/8"-34-1/2")
962 - 983mm (37-7/8"-38-3/4")
994 - 1015mm (39-1/8"-40")
1026 - 1047mm (40-3/8"-41-1/4")
1058 - 1079mm (41-5/8"-42-1/2")
Note: minimum 933 mm (36-3/4" height required to fit with a mobile unit (lower cabinet with casters) under the workbench.
Safety and care
<
Safety and care
Safety
Note! Do not place Elfa products in direct contact with water.
Care
Wipe clean with a cloth dampered with a mild cleaner. Wipe dry with a clean cloth.
Assembly Instructions
<
Assembly Instructions
Step 1: Place the work bench upside down on the floor.
Step 2: To distinguish between the front and rear legs, identify the two holes on the top side of the rear leg. Place the two rear legs at the back edge of the work bench. The opening of the U‑shaped legs should face backwards.
Step 3 (optional): If you want to attach the work bench to the wall, place the included small L‑shaped wall mounts at the outer edge of each rear leg. The long part of the “L” should be positioned on the outer sheet‑metal part of the leg.
Step 4: Attach the rear legs to the work bench using 8 hex screws (4 per leg). Do not fully tighten yet.
Step 5: Place the two front legs at the front edge of the work bench. The opening of the U‑shaped legs should face backwards. Attach the front legs using 8 hex screws (4 per leg). Do not fully tighten yet.
Step 6: Attach the first adjustable foot part to one of the rear legs using 2 screws and 2 nuts. It is recommended to use the fourth hole if you want a mobile drawer system unit under the work bench.
Step 7: Attach the remaining adjustable foot parts to the other bench legs using the remaining 6 screws and 6 nuts. Preferably use the fourth hole if you want a mobile cabinet with casters under the work bench.
Step 8: Locate the side brace and attach it in the predefined holes between the front and rear legs (left and right) using 6 screws and 6 nuts per leg.
Step 9: Now fully tighten all screws and nuts.
Step 10: Align the rear stabilising brace and attach it between the rear legs in the predefined holes on the back of the legs, using 4 hex screws.
Step 11: Attach the rear stabilising brace to the work bench using 5 screws through the predefined holes.
Step 12: Turn the work bench to the upright position (at least 2 people required).
Step 13: Adjust the adjustable feet on the work bench legs to level the work bench. Turn clockwise to increase the height.
Step 14 (optional): If you want to secure the work bench to the wall, place it against the wall and fasten using screws through the L‑shaped wall mounts. Screws not included.